


How to Build a Meat Curing Chamber for under $200
NEW: Check out the video on youtube. The 30-minute video walks you through how to use this entire setup!
My meat curing chamber is a converted wine cooler in my basement. The purpose of the meat curing chamber is to create an environment in which to cure meats that were consistently 70% relative humidity at 65°F, without spending a lot of money or creating some sort of giant that I couldn’t move easily.
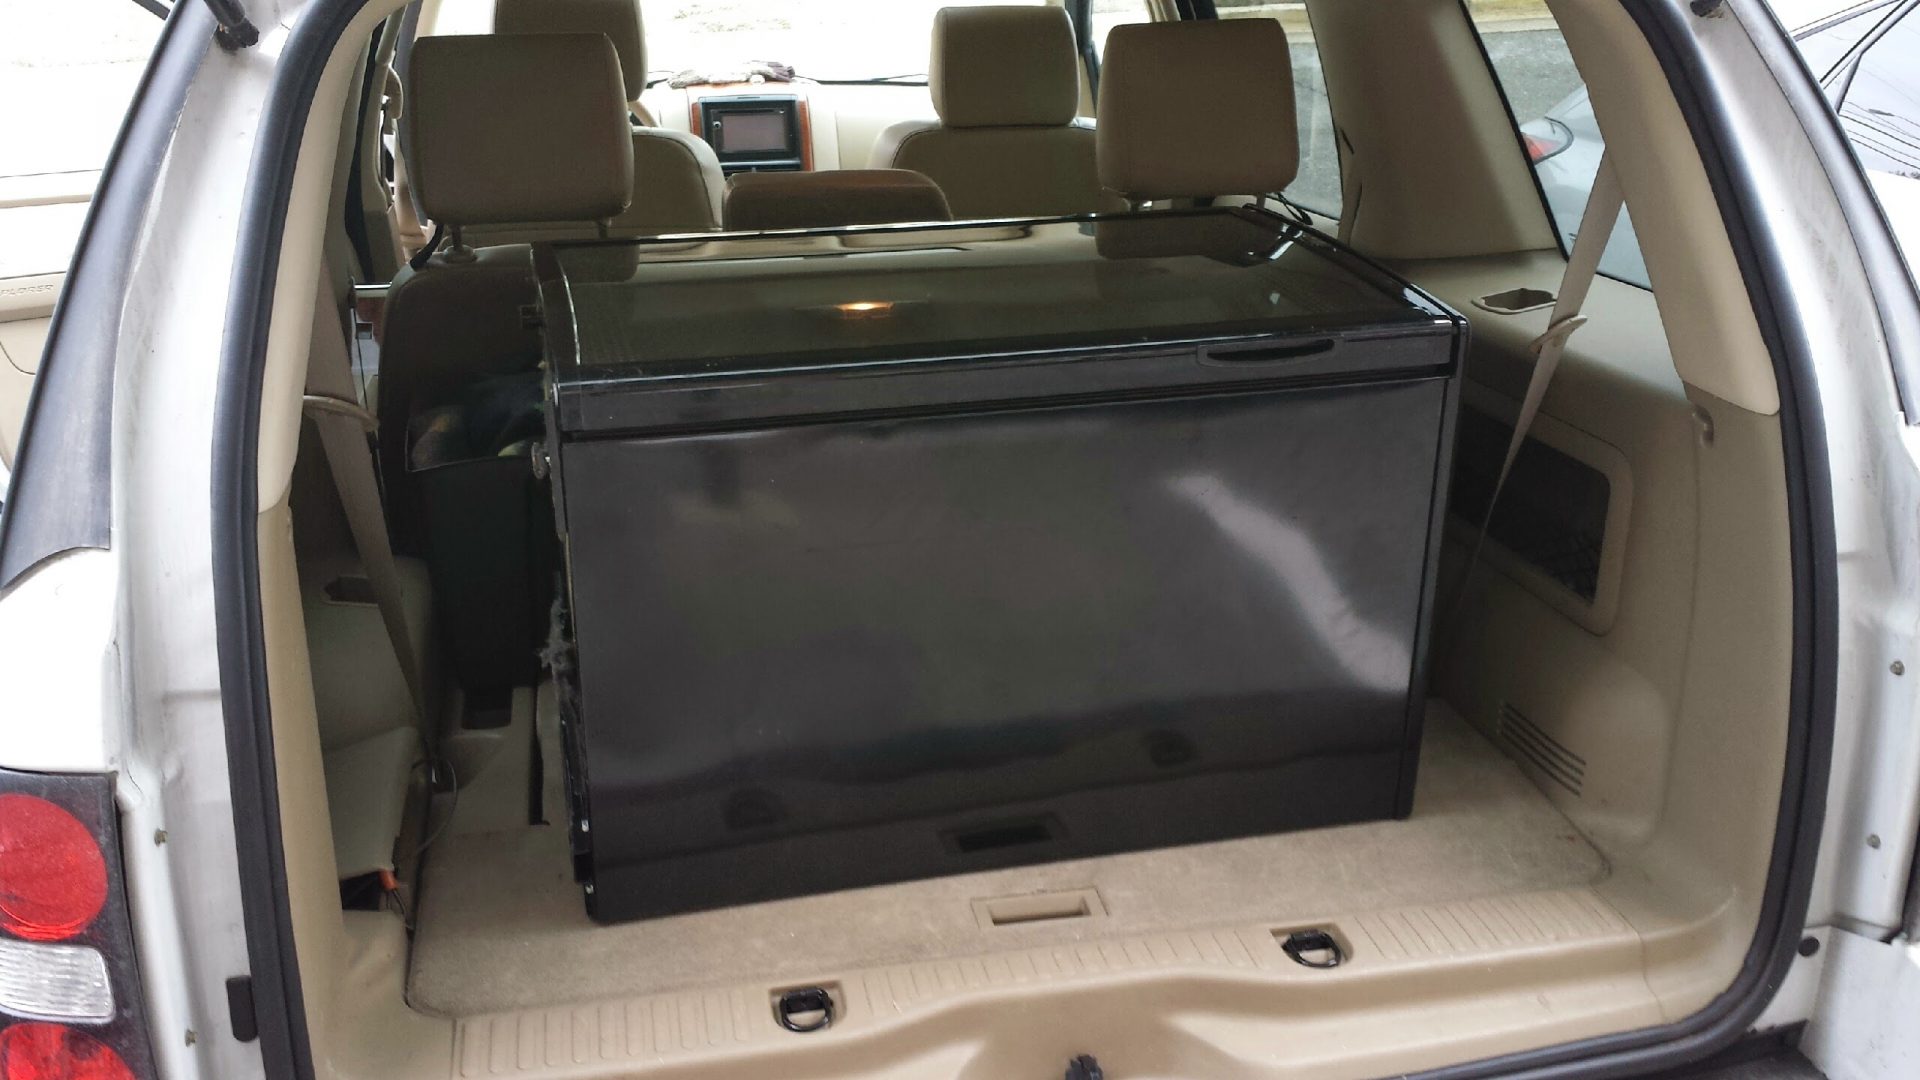
A quick search on craigslist.org yielded this little beauty. A Danby Millennium Home Wine Cooler. The asking price of $100 was a third of its sticker price. The original owner had kept it nice and clean. Upon inspection, I found it to be super cold inside and running quietly when they showed it. I couldn’t resist.
A quick scan of the user’s manual showed that the range of this device was 42° – 65°F, so I knew I’d have to replace the thermostat. While I was at it, I figured I’d wire in a hygrostat, too, to keep the humidity in check. These digital thermostats are actually pretty cool. They run on 120V. They tap the hot circuit to run and then offer a probe and a relay. My challenge was to wire them in parallel to provide switched power to the compressor and also be able to run a humidifier or maybe a dehumidifier, but that would come later, once I had some idea of what the humidity would be under normal operation.
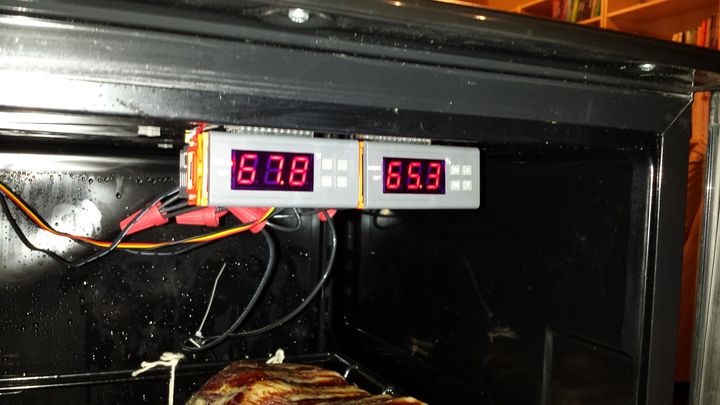
Here are the basic inputs and outputs on the digital controller.
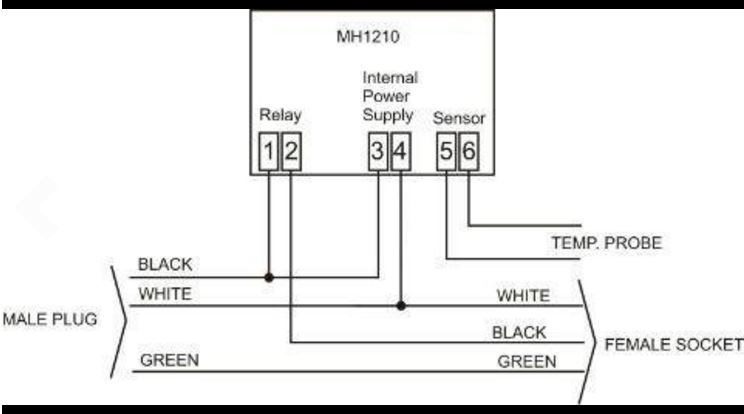
I used some heavy-duty plastic Velcro-type mounting tabs to hold them to the roof of the fridge. I had some trouble finding good, clear, instructions on how to program the controls once I got them installed. Here are some links to the pdfs of the manuals. These were the best ones that I could find:
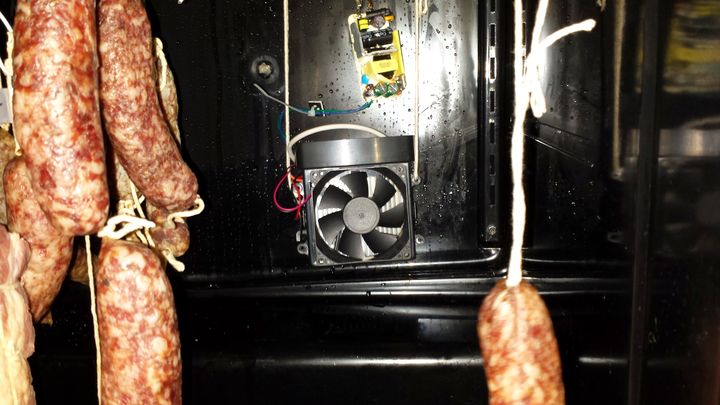
Unlike everybody else in the world, I need a dehumidifier in my cure box. You can see the moisture on the walls. I found a tiny closet-sized Thermo-Electric Dehumidifier on Amazon.com. With a little brute strength and some sharp tools, I was able to make it even smaller. It has some condenser fins on the back of it that conveniently drip right into the drain on the back of the fridge. The drain empties into a pan under the fridge that allows the condensate to evaporate to the outside room. I’m still working on the mounting of the dehumidifier. Right now, it’s hanging with some butchers’ twine. Not great, but functional. There’s also a lot of exposed 110V circuitry but we’re not even talking about that right now. In retrospect, I would have kept the dehumidifier intact and plugged it into a 3 Pins Power Socket Plug.
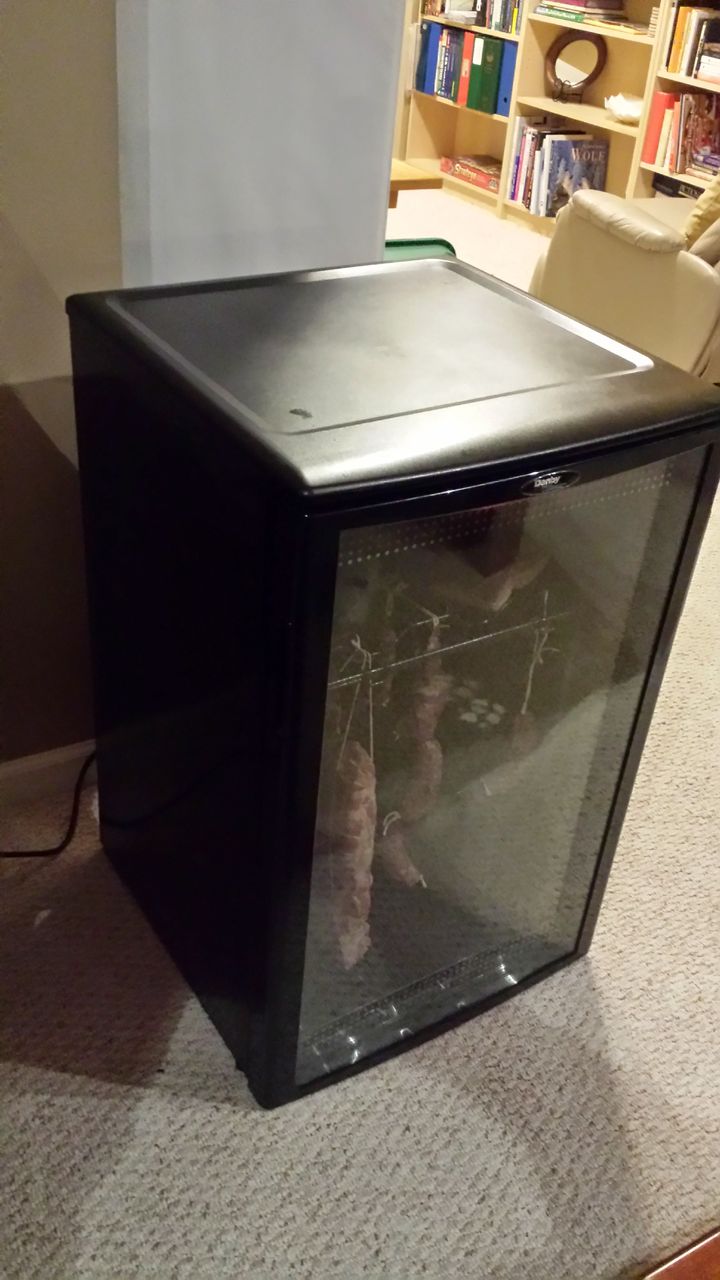
The Meat Curing Chamber is a success! The digital controls are visible through the door of the old wine cooler–as are the salame! The controls work nicely with the compressor. The STC-1000 even has a programmable delay to keep the compressor from cycling on and off too quickly, thus extending its life. There’s usually a couple of ounces of water in the condensate evaporator tray. It’s right on top of the compressor, utilizing its heat to drive the evaporation.
NEW: Check out the video on youtube
2019 UPDATE: Look at this cool new controller from INKBIRD:
Nice job! Did a similar build myself recently, using the same humidity controller, but a slightly different temp controller. Mine only does either heating OR cooling, I think the STC1000 does both. I’ll have to check back to see how yours is going 🙂
Indeed it does!
Pingback: How to Salt Cure and Air Dry a Homemade Coppa - Better Done Yourself
Im looking into building one of these my self and this was the best way I’ve seen so far nice and compact. My question is did you need the dehumidifier because you had it set at 65 and it naturally got that humid in there at the 65 degrees ? and did you have to by pass anything out of the ordinary when doing this with the wiring? thanks for your time!
Or is it that you used a wine fridge rather than a traditional refrigerator? there is a note on using wine fridges here: http://curedmeats.blogspot.com/2012/08/lets-talk-curing-chambers.html
Great post – I have been doing some home curing in an unmodified wine fridge, to some success, but I know I need to fix the humidity issue. I was curious why you replaced the thermostat – isn’t 50-60F the ideal temp?
Also, how hard do you think it would be for someone with very minimal electrical experience to wire in a dehumidifier/hygrostat? The link to the wiring schematic didn’t work – could you send me a copy? thanks!!
Neil
Wondering if I can build a smoker out of a glass wine fridge using electric burner?
I’ve been thinking about this. I don’t think it would be a good idea because this insides of such are made of cold temp plastic. You should think about finding a metal box.
I like this idea. I am going to have to try it
Thank you
hi, is it possible to adapt a big bottle cooler into a curing chamber, to make biltong?
What I mean with adapt if its possible use the original fan, motor and compressor of this machines, cause they already come with a dehumidifing system and a thermostat!!
Thanks
Kind Regards
Ignacio
Since I don’t have luck trying to put hole in the side of the mini fridge which I cut the Freon tubing for the freezer compartment I don’t have any choice to dump this mini fridge. After watching your video in converting a mini wine cooler for a meat curing chamber, I have decided to convert a wine cooler for meat curing chamber. I HAVE A WIFI ITC-308-W(TEMP) AND A ICH-200-W( Humidity), can I USE THIS CONTROLLER INSTEAD OF THE STC-1000 ? Also, can I do the same procedure for thermostat parallel wiring. (shorting out the thermostat) I also notice in the picture of a PC FAN, what is the function of the fan, can you hook it with the ICH-200-W?
1win az basketbol mərcləri 1win az basketbol mərcləri
перепланировка проект перепланировка проект .
Покупка дипломов ВУЗов по всей Украине — с печатями, подписями, приложением и возможностью архивной записи (по запросу).
Документ максимально приближен к оригиналу и проходит визуальную проверку.
Мы гарантируем, что в случае проверки документа, подозрений не возникнет.
– Конфиденциально
– Доставка 3–7 дней
– Любая специальность
Уже более 999 клиентов воспользовались услугой — теперь ваша очередь.
На сайте — ответим быстро, без лишних формальностей.
Оформиление дипломов ВУЗов по всей Украине — с печатями, подписями, приложением и возможностью архивной записи (по запросу).
Документ максимально приближен к оригиналу и проходит визуальную проверку.
Мы гарантируем, что в случае проверки документа, подозрений не возникнет.
– Конфиденциально
– Доставка 3–7 дней
– Любая специальность
Уже более 4267 клиентов воспользовались услугой — теперь ваша очередь.
На сайте — ответим быстро, без лишних формальностей.
1win az apk yüklə https://www.1win3041.com
afdl brwmw kwd 1xbet afdl brwmw kwd 1xbet .
купить узи сканер http://www.kupit-uzi-apparat8.ru .
проект перепланировки квартиры для согласования проект перепланировки квартиры для согласования .
диплом купить в орле диплом купить в орле .
узи аппарат цена новый купить в россии http://www.kupit-uzi-apparat8.ru .
медицинское оборудование узи http://www.kupit-uzi-apparat9.ru .
заказать проект перепланировки квартиры в москве заказать проект перепланировки квартиры в москве .
тмг трансформатор тмг трансформатор .
Заказать диплом вы имеете возможность используя сайт компании. sciencenewhop.maxbb.ru/viewtopic.php?f=44&t=1318
[url=http://kupit-drova-kolotye-812.ru]kupit-drova-kolotye-812.ru[/url] .
1xbet 1xbet .
Недорогая инженерная доска inzenernay-doska1.ru .
сколько стоит аппарат узи цена http://www.kupit-uzi-apparat8.ru .
перепланировка проект перепланировка проект .
стоматология Архангельск запись стоматология Архангельск запись .
Оформиление дипломов ВУЗов по всей Украине — с печатями, подписями, приложением и возможностью архивной записи (по запросу).
Документ максимально приближен к оригиналу и проходит визуальную проверку.
Мы даем гарантию, что в случае проверки документа, подозрений не возникнет.
– Конфиденциально
– Доставка 3–7 дней
– Любая специальность
Уже более 3988 клиентов воспользовались услугой — теперь ваша очередь.
Сайт компании — ответим быстро, без лишних формальностей.
Hi! online pharmacy beneficial website.
tahmil la bah 888starz tahmil la bah 888starz .
узи аппараты цена http://www.kupit-uzi-apparat8.ru .
масляный трансформатор масляный трансформатор .
купить диплом вуза занесением реестр https://arus-diplom34.ru/ .
купить трансформатор силовой масляный трехфазный maslyanie-transformatory-kupit.ru .
Thanks for the article. Here’s more on the topic https://tonersklad.ru/
медицинский аппарат узи kupit-uzi-apparat10.ru .
аппарат ультразвуковой диагностики цена kupit-uzi-apparat9.ru .
Замковая инженерная доска Дуб в Декор Экспо. http://www.inzenernay-doska1.ru/ .
портативный узи сканер портативный узи сканер .
x bet x bet .
ТГ накрутка подписчиков ТГ накрутка подписчиков
Here’s more on the topic https://kinocirk.ru/
трансформаторы масляные http://www.maslyanie-transformatory-kupit.ru .
tasjil 888starz tasjil 888starz .
аппарат узи стоимость https://kupit-uzi-apparat9.ru/ .
я купил проведенный диплом я купил проведенный диплом .
купить новый узи аппарат купить новый узи аппарат .
1ex bet 1ex bet .
Напольная инженерная доска на кухню. https://inzenernay-doska1.ru/ .
аппарат узи для коров цена http://www.kupit-uzi-apparat10.ru .
Мы предлагаем дипломы любых профессий по приятным тарифам. Купить диплом педагогического института — kyc-diplom.com/diplom-articles/kupit-diplom-pedagogicheskogo-instituta.html
тмг цены https://www.maslyanie-transformatory-kupit.ru .
Мы предлагаем документы ВУЗов, расположенных на территории всей Российской Федерации. Заказать диплом любого университета:
купить аттестаты за 11 отзывы
купить трансформатор силовой масляный трехфазный купить трансформатор силовой масляный трехфазный .
мед аппарат узи https://www.kupit-uzi-apparat15.ru .
самая дешёвая свая ostankino-svai.ru .
школьный аттестат купить школьный аттестат купить .
виды аппаратов узи http://www.kupit-uzi-apparat9.ru .
инженерная доска Альянс паркет http://www.inzenernay-doska1.ru/ .
трансформаторы тмг http://www.maslyanie-transformatory-kupit.ru .
купить трансформаторы масляные купить трансформаторы масляные .
купить аппарат узи цены [url=kupit-uzi-apparat10.ru]купить аппарат узи цены[/url] .
1x 1x .
узи сканер купить узи сканер купить .
трансформатор масляный https://maslyanie-transformatory-kupit1.ru/ .
масляные трансформаторы купить maslyanie-transformatory-kupit.ru .
цена аппарата узи kupit-uzi-apparat9.ru .
melbet kz скачать https://melbet3002.com
аппарат узи цена в россии аппарат узи цена в россии .
bonus code 1win 2024 http://www.1win3046.com
1win original 1win original
melbet online casino melbet online casino
Hi there! pam pharma very good internet site.
аппарат узи стоимость аппарат узи стоимость .
thmyl aviator predictor 1xbet thmyl aviator predictor 1xbet .
melbet deposit options http://melbet3002.com/
трансформатор силовой купить maslyanie-transformatory-kupit2.ru .
1win casa de apuestas https://www.1win3048.com
Купить инженерную доску inzenernay-doska1.ru .
купить узи аппарат цена http://www.kupit-uzi-apparat9.ru/ .
купить трансформатор тмг https://www.maslyanie-transformatory-kupit.ru .
аттестат за 11 класс купить в братске аттестат за 11 класс купить в братске .
где можно купить аттестат за 11 класс адрес где можно купить аттестат за 11 класс адрес .
ramz tarwiji 888starz ramz tarwiji 888starz .
melbet .com https://melbet3002.com/
сколько стоит аппарат узи для людей цена kupit-uzi-apparat10.ru .
скачать melbet melbet https://melbet3002.com/
узи сканер купить москва https://kupit-uzi-apparat15.ru .
bonus code 1win 2024 https://www.1win3047.com
новые аппараты узи https://www.kupit-uzi-apparat9.ru .
купить аттестаты за 11 класс мурманск купить аттестаты за 11 класс мурманск .
масляный трансформатор купить масляный трансформатор купить .
1win casino oyunları 1win casino oyunları
1win cashback bonus 1win cashback bonus
1win aviator http://1win3037.com
аппарат узи цена в россии [url=http://www.kupit-uzi-apparat15.ru]аппарат узи цена в россии[/url] .
1win token https://www.1win3044.com
тмг http://maslyanie-transformatory-kupit1.ru .
one x bet one x bet .
1win online http://www.1win3047.com
инженерная доска Альянс паркет http://inzenernay-doska1.ru .
1win inscription 1win3046.com
1win lisenziyası http://1win3037.com
Hi! online pharmacy good website.
узи аппараты среднего класса kupit-uzi-apparat9.ru .
1win virtual idman https://1win3038.com/
узи оборудование цена узи оборудование цена .
трехфазный трансформатор масляный купить https://maslyanie-transformatory-kupit2.ru/ .
1win bonus 1win bonus
стоимость аппарата узи цена стоимость аппарата узи цена .
bono de casino 1win https://1win3045.com/
1win betting http://1win3045.com
bbruth 1win http://1win3048.com/
1win bonus code http://1win3044.com/
купить узи аппарат цена купить узи аппарат цена .
1win az giriş bloku http://1win3037.com/
масляные трансформаторы купить масляные трансформаторы купить .
888starz egypt 888starz egypt .
melbet промокод без депозита http://melbet3001.com/
мелбет официальный сайт войти https://www.melbet3001.com
стоимость масляного трансформатора http://maslyanie-transformatory-kupit2.ru/ .
сколько стоит узи аппарат https://www.kupit-uzi-apparat9.ru .
1win app 1win3047.com
силовой тмг http://maslyanie-transformatory-kupit1.ru .
1win az promo ilə qeydiyyat https://1win3037.com/
1win casino en línea http://www.1win3044.com
купить аппарат узи цены новый http://kupit-uzi-apparat10.ru/ .
1win az http://1win3038.com/
Hello! buy ed drugs pills great internet site.
1win az canlı mərclər http://www.1win3037.com
купить аттестат за 11 классов вечерней школы купить аттестат за 11 классов вечерней школы .
1win qeydiyyat zamanı bonus http://1win3043.com
узи аппарат купить цена http://www.kupit-uzi-apparat9.ru .
1win promo kodu necə daxil etməli 1win promo kodu necə daxil etməli
где купить узи аппарат http://www.kupit-uzi-apparat10.ru .
масляный трансформатор купить http://www.maslyanie-transformatory-kupit2.ru .
1win партнер http://www.1win3047.com
купить диплом с занесением в реестр в уфе https://arus-diplom31.ru/ .
1win az giriş https://www.1win3043.com
доставка воды на дачу цистерна цена http://www.dostavka-tehnicheskoi-vodi.ru .
aviator 1win http://www.1win3046.com
ставки на спорт аналитика прогнозы http://www.stavki-na-sport-prognozy.ru .
трехфазный трансформатор масляный купить http://www.maslyanie-transformatory-kupit2.ru .
мелбет ру melbet3001.com
купить аттестат 10 11 класс в красноярске купить аттестат 10 11 класс в красноярске .
тмг maslyanie-transformatory-kupit1.ru .
1win apk android 1win3046.com
купить диплом о высшем образовании с занесением в реестр владивосток https://www.arus-diplom35.ru .
скачат мелбет http://melbet3002.com
аппарат узи стоимость оборудования http://kupit-uzi-apparat10.ru .
трансформатор тм http://www.maslyanie-transformatory-kupit.ru .
1win daxil ol https://www.1win3043.com
скачать мелбет с 1xgames скачать мелбет с 1xgames
купить узи аппарат цена купить узи аппарат цена .
1win партнерка отзывы 1win партнерка отзывы
melbet kz скачать http://melbet3001.com
купить трансформатор силовой масляный трехфазный maslyanie-transformatory-kupit1.ru .
888starz agent 888starz agent .
melbet партнерская программа http://melbet3001.com/
техническая вода с доставкой https://dostavka-tehnicheskoi-vodi.ru/ .
Hello! order ed drugs beneficial internet site.
лига ставок прогнозы http://www.stavki-na-sport-prognozy.ru .
аппарат узи цена в россии новый http://www.kupit-uzi-apparat10.ru .
1win depozit bonusu http://1win3043.com
диплом купить москва диплом купить москва .
1win mexico https://www.1win3046.com
1win qeydiyyat necə olur https://www.1win3043.com
1win mx https://www.1win3044.com
melbet букмекерская кантора http://melbet3001.com
прогнозы на ставки http://www.stavki-na-sport-prognozy.ru/ .
доставка технической воды спб dostavka-tehnicheskoi-vodi.ru .
тмг цены http://www.maslyanie-transformatory-kupit.ru/ .
casino en 1 win https://www.1win3046.com
портативный узи сканер купить портативный узи сканер купить .
где можно купить аттестат 11 где можно купить аттестат 11 .
1win descargar https://1win3044.com/
download melbet app https://www.melbet3002.com
каталог трансформаторов каталог трансформаторов .
купить диплом с реестром о высшем образовании купить диплом с реестром о высшем образовании .
техническая водадоставка технической воды http://dostavka-tehnicheskoi-vodi.ru/ .
Добавить подписчиков в Телеграм канал Добавить подписчиков в Телеграм канал
Getting it sane, like a demoiselle would should
So, how does Tencent’s AI benchmark work? Prime, an AI is confirmed a shining reprove from a catalogue of closed 1,800 challenges, from construction figures visualisations and интернет apps to making interactive mini-games.
Post-haste the AI generates the arrangement, ArtifactsBench gets to work. It automatically builds and runs the mould in a shut and sandboxed environment.
To upwards how the haunt behaves, it captures a series of screenshots ended time. This allows it to interrogate respecting things like animations, avow changes after a button click, and other unmistakeable consumer feedback.
Conclusively, it hands to the school all this asseverate – the autochthonous solicitation, the AI’s encrypt, and the screenshots – to a Multimodal LLM (MLLM), to face as a judge.
This MLLM adjudicate isn’t tow-headed giving a undecorated философема and as contrasted with uses a particularized, per-task checklist to armies the d‚nouement upon across ten selected metrics. Scoring includes functionality, purchaser working swain heartthrob obligation, and unaffiliated aesthetic quality. This ensures the scoring is respected, in conformance, and thorough.
The efficacious discuss is, does this automated beak sic deserve careful taste? The results nudge it does.
When the rankings from ArtifactsBench were compared to WebDev Arena, the gold-standard aura where bona fide humans философема on the unexcelled AI creations, they matched up with a 94.4% consistency. This is a elephantine sudden from older automated benchmarks, which solely managed hither 69.4% consistency.
On unnerve prat of this, the framework’s judgments showed at an unoccupied 90% unanimity with competent perchance manlike developers.
https://www.artificialintelligence-news.com/
tanzil tatbiq 888starz tanzil tatbiq 888starz .
melbet bonus http://melbet3002.com/
купить трансформатор тмг https://maslyanie-transformatory-kupit.ru .
сколько стоит узи аппарат сколько стоит узи аппарат .
стоимость масляного трансформатора http://www.maslyanie-transformatory-kupit2.ru .
трансформатор масляный http://www.maslyanie-transformatory-kupit1.ru .
1win 1win
тмг трансформатор тмг трансформатор .
масляный трансформатор http://www.maslyanie-transformatory-kupit.ru .
ультразвуковой диагностический аппарат ультразвуковой диагностический аппарат .
доставка технической воды водовозом https://www.dostavka-tehnicheskoi-vodi.ru .
ставки и прогнозы букмекеров на футбол сегодня http://stavki-na-sport-prognozy.ru/ .
ставки ру stavki-na-sport-prognozy2.ru .
трансформаторы тмг http://maslyanie-transformatory-kupit1.ru .
Thanks for the article. Here’s more on the topic https://l-spb.ru/
масляные трансформаторы http://maslyanie-transformatory-kupit.ru/ .
1win lisenziyası http://www.1win3043.com
ультразвуковой аппарат цена ультразвуковой аппарат цена .
техвода https://dostavka-tehnicheskoi-vodi.ru/ .
1xBet — это одна из самых популярных и надежных платформ, которая предлагает уникальные возможности и привлекательные бонусы для своих пользователей. Независимо от того, являетесь ли вы новичком в мире ставок или опытным игроком, 1xBet промокод 2025, воспользуйтесь бонусным промокодом, чтобы получить бесплатный приветственный бонус в размере 100%. При регистрации введите данный код и получите бонус до 32 500 рублей (или эквивалент в другой валюте до 130$).
melbet download iphone melbet3002.com
прогнозы на сегодня http://www.stavki-na-sport-prognozy.ru/ .
Hi! buy ed drugs medication great web site.
купить легально диплом [url=arus-diplom35.ru]купить легально диплом[/url] .
аттестат купить 9 класс аттестат купить 9 класс .
Заказать диплом о высшем образовании поспособствуем. Купить диплом специалиста Орёл – diplomybox.com/kupit-diplom-spetsialista-v-orle
трансформатор тмг трансформатор тмг .
где купить аттестат за 11 класс в череповце где купить аттестат за 11 класс в череповце .
как вывести деньги с melbet melbet3001.com
мелбет сайт https://www.melbet3001.com
прогнощы http://stavki-na-sport-prognozy2.ru/ .
1win deposit http://1win3046.com
como retirar en 1win http://1win3048.com
1win affiliate login https://www.1win3046.com
1win affiliation http://1win3045.com/
трансформатор тмг трансформатор тмг .
melbet plinko https://www.melbet3002.com
Оформиление дипломов ВУЗов по всей Украине — с печатями, подписями, приложением и возможностью архивной записи (по запросу).
Документ максимально приближен к оригиналу и проходит визуальную проверку.
Мы гарантируем, что в случае проверки документа, подозрений не возникнет.
– Конфиденциально
– Доставка 3–7 дней
– Любая специальность
Уже более 1865 клиентов воспользовались услугой — теперь ваша очередь.
Купить диплом Украина — ответим быстро, без лишних формальностей.
Покупка дипломов ВУЗов по всей Украине — с печатями, подписями, приложением и возможностью архивной записи (по запросу).
Документ максимально приближен к оригиналу и проходит визуальную проверку.
Мы даем гарантию, что в случае проверки документа, подозрений не возникнет.
– Конфиденциально
– Доставка 3–7 дней
– Любая специальность
Уже более 3723 клиентов воспользовались услугой — теперь ваша очередь.
Уточнить здесь — ответим быстро, без лишних формальностей.
Покупка дипломов ВУЗов по всей Украине — с печатями, подписями, приложением и возможностью архивной записи (по запросу).
Документ максимально приближен к оригиналу и проходит визуальную проверку.
Мы гарантируем, что в случае проверки документа, подозрений не возникнет.
– Конфиденциально
– Доставка 3–7 дней
– Любая специальность
Уже более 2437 клиентов воспользовались услугой — теперь ваша очередь.
Узнать условия — ответим быстро, без лишних формальностей.
videos 1win https://1win3046.com
download 1win download 1win
que es 1win que es 1win
videos 1win http://1win3046.com
масляный трансформатор масляный трансформатор .
Быстро и просто приобрести диплом об образовании!
Мы можем предложить дипломы психологов, юристов, экономистов и любых других профессий по разумным тарифам— kubmat.ru
casino online 1win http://1win3048.com
ставки прогноз ставки прогноз .
Мы предлагаем оформление дипломов ВУЗов В киеве — с печатями, подписями, приложением и возможностью архивной записи (по запросу).
Документ максимально приближен к оригиналу и проходит визуальную проверку.
Мы гарантируем, что в случае проверки документа, подозрений не возникнет.
– Конфиденциально
– Доставка 3–7 дней
– Любая специальность
Уже более 3261 клиентов воспользовались услугой — теперь ваша очередь.
Открыть — ответим быстро, без лишних формальностей.
1win x https://www.1win3047.com
app 888starz app 888starz .
descargar 1win http://www.1win3044.com
casino en 1 win http://1win3046.com/
1win http://www.1win3044.com
dostavka-drov-na-dachu-812.ru .
ставкипрогнозы http://stavki-na-sport-prognozy1.ru .
Покупка дипломов ВУЗов по всей Украине — с печатями, подписями, приложением и возможностью архивной записи (по запросу).
Документ максимально приближен к оригиналу и проходит визуальную проверку.
Мы даем гарантию, что в случае проверки документа, подозрений не возникнет.
– Конфиденциально
– Доставка 3–7 дней
– Любая специальность
Уже более 3677 клиентов воспользовались услугой — теперь ваша очередь.
Купить диплом о высшем образовании — ответим быстро, без лишних формальностей.
Мы предлагаем оформление дипломов ВУЗов по всей Украине — с печатями, подписями, приложением и возможностью архивной записи (по запросу).
Документ максимально приближен к оригиналу и проходит визуальную проверку.
Мы даем гарантию, что в случае проверки документа, подозрений не возникнет.
– Конфиденциально
– Доставка 3–7 дней
– Любая специальность
Уже более 3819 клиентов воспользовались услугой — теперь ваша очередь.
Здесь — ответим быстро, без лишних формальностей.
ставки и прогнозы ставки и прогнозы .
androide mostbet indir androide mostbet indir .
1win affiliates https://1win3048.com
1win az qeydiyyat 1win az qeydiyyat
melbet фрибет https://www.melbet3001.com
Доставка в любые российские регионы и другие страны https://sinapple.ru/collection/kremy-dlya-litsa/product/keenwell-oxidance-crema-antioxidante-regeneradora-noche-vit-cc
Какие дни благоприятны для стрижки и салонных уходовых процедур, а в какие лучше воздержаться от посещения парикмахера? Рассказываем!
доставка воды на стройку https://dostavka-tehnicheskoi-vodi.ru/ .
прогнозы ставок http://www.stavki-na-sport-prognozy.ru/ .
прогнозы прогнозы .
проверить купон мелбет http://www.melbet3002.com
melbet game download melbet game download
купить трансформаторы масляные http://www.maslyanie-transformatory-kupit1.ru/ .
ставки и прогнозы на спорт http://stavki-na-sport-prognozy.ru .
bonificacion de casino 1win https://1win3045.com
1win jetx http://1win3048.com/
1win android http://1win3048.com/
привозная вода цена за куб http://dostavka-tehnicheskoi-vodi.ru/ .
melbet игровые автоматы melbet игровые автоматы
трансформатор тм maslyanie-transformatory-kupit1.ru .
ставка прогноз http://stavki-na-sport-prognozy.ru .
прогноз ставок прогноз ставок .
code bonus 1win https://1win3047.com
1win mobil qeydiyyat https://1win3043.com/
прогноз ставки на спорт http://www.stavki-na-sport-prognozy1.ru .
mines pro 1win mines pro 1win
melbet зеркало 2020 https://melbet3001.com
как пополнить счет на melbet как пополнить счет на melbet
plinko 1win https://1win3047.com
1win az aviator strategiya 1win3043.com
melbet скачать apk https://melbet3003.com/
ставки прогнозы https://www.stavki-na-sport-prognozy.ru .
1win az casino 1win az casino
перевозка воды http://dostavka-tehnicheskoi-vodi.ru/ .
Мы предлагаем оформление дипломов ВУЗов В киеве — с печатями, подписями, приложением и возможностью архивной записи (по запросу).
Документ максимально приближен к оригиналу и проходит визуальную проверку.
Мы даем гарантию, что в случае проверки документа, подозрений не возникнет.
– Конфиденциально
– Доставка 3–7 дней
– Любая специальность
Уже более 2538 клиентов воспользовались услугой — теперь ваша очередь.
Купить дипломы о высшем — ответим быстро, без лишних формальностей.
mel bet kz https://www.melbet3007.com
Оформиление дипломов ВУЗов В киеве — с печатями, подписями, приложением и возможностью архивной записи (по запросу).
Документ максимально приближен к оригиналу и проходит визуальную проверку.
Мы даем гарантию, что в случае проверки документа, подозрений не возникнет.
– Конфиденциально
– Доставка 3–7 дней
– Любая специальность
Уже более 3982 клиентов воспользовались услугой — теперь ваша очередь.
Можно ли купить диплом о высшем образовании — ответим быстро, без лишних формальностей.
ставка на спорт прогнозы stavki-na-sport-prognozy2.ru .
1win idman mərcləri https://1win3043.com
1win az apk yüklə http://www.1win3043.com
Hello! usa non peescription pharmacy good website.
прогноз на спорт на сегодня от профессионалов http://prognozy-na-sport-2.ru/ .
melbet sports live melbet3007.com
техническая вода цена dostavka-tehnicheskoi-vodi.ru .
высокопроходимые прогнозы на спорт высокопроходимые прогнозы на спорт .
бк мелбет официальный сайт зеркало https://www.melbet3003.com
скачать мелбет зеркало http://melbet3003.com
melbet скачать 2023 http://melbet3007.com
melbet баланс 500 рублей http://www.melbet3003.com
жб прогнозы на футбол сегодня http://www.prognozy-na-futbol-1.ru/ .
Thanks for the article. Here is a website on the topic – https://kanunnikovao.ru/
прогноз букмекеров на сегодня http://www.stavki-na-sport-prognozy.ru .
mostbet az virtual oyunlar mostbet az virtual oyunlar
melbet ios app melbet ios app
1win партнерка 1win партнерка
спорт прогнозы на спорт от профессионалов бесплатно http://prognozy-na-sport-3.ru .
melbet вход 2019 https://melbet3007.com/
техническая вода цена https://dostavka-tehnicheskoi-vodi.ru .
прогнозы ставки http://stavki-na-sport-prognozy.ru .
прогнозы на сегодня [url=https://www.stavki-na-sport-prognozy2.ru]прогнозы на сегодня[/url] .
cuenta de bonificación del casino 1win http://1win3045.com/
melbet sports live melbet3007.com
мелбет бонусный счет http://melbet3005.com/
купить аттестат за 11 класс рязань http://www.arus-diplom21.ru/ .
прогнозы на спорт с высокой проходимостью бесплатно с большим коэффициентом http://www.prognozy-na-sport-2.ru .
прогноз ставка http://www.stavki-na-sport-prognozy1.ru .
точный прогнозы на футбол http://www.prognozy-na-futbol-1.ru .
доставка технической воды спб dostavka-tehnicheskoi-vodi.ru .
прогнозы по ставкам http://www.stavki-na-sport-prognozy2.ru .
я купил диплом с проводкой я купил диплом с проводкой .
mostbet az aviator strategiya mostbet4055.ru
прогнозы и ставки на спорт http://prognozy-na-sport-3.ru .
точный прогнозы на футбол http://www.prognozy-na-futbol-2.ru .
1win ios http://1win3045.com
Hi there! online us pharmacies great internet site.
1win partners 1win partners
спорт прогнозы от профессионалов [url=prognozy-na-sport-2.ru]prognozy-na-sport-2.ru[/url] .
продажа пластиковых окон в москве rem-okoshko.ru .
корочки для аттестата купить за 11 класс корочки для аттестата купить за 11 класс .
промокоды на мелбет melbet3003.com
точные прогнозы на футбол сегодня бесплатно http://www.prognozy-na-futbol-1.ru/ .
mostbet site oficial baixar mostbet site oficial baixar .
ставки прогнозы на спорт http://stavki-na-sport-prognozy2.ru/ .
спорт прогнозы бесплатно http://prognozy-na-sport-3.ru/ .
mostbet pul çıxarma http://mostbet4055.ru
ближайшие прогнозы на спорт https://prognozy-na-sport-2.ru/ .
ставки на спорт ставки на спорт .
прогнозы на футбол prognozy-na-futbol-1.ru .
Thanks for the article. Here’s more on the topic mirka-master.ru .
купить диплом с проводкой моих купить диплом с проводкой моих .
дома под ключ московская область каркас дома под ключ московская область каркас .
bonus code 1win 2024 http://1win3045.com
аналитика ставок на спорт http://www.stavki-na-sport-prognozy2.ru .
прогноз на футбол на сегодня от профессионалов https://prognozy-na-futbol-2.ru .
ставки на спорт прогнозы бесплатно http://prognozy-na-sport-2.ru/ .
точные прогнозы на спорт точные прогнозы на спорт .
где купить аттестаты за 11 класс с занесением в реестр отзывы где купить аттестаты за 11 класс с занесением в реестр отзывы .
прогноз ставок на футбол http://www.prognozy-na-futbol-1.ru .
мелбет официальный сайт http://www.melbet3004.com
высокоточные прогнозы на спорт http://prognozy-na-sport-1.ru/ .
прогноз ставок на сегодня прогноз ставок на сегодня .
прогнозы prognozy-na-sport-3.ru .
промокод мелбет 2024 https://melbet3003.com/
прогноз букмекеров на сегодня https://stavki-na-sport-prognozy1.ru .
самые точные прогнозы на хоккей prognozy-na-khokkej-segodnya.ru .
1win bono de bienvenida 1win bono de bienvenida
1win casino online http://1win3045.com/
melbet kz промокод melbet kz промокод
точные прогнозы на спорт от экспертов бесплатно на сегодня https://www.prognozy-na-sport-2.ru .
прогноз ставок на футбол https://prognozy-na-futbol-2.ru/ .
Оформиление дипломов ВУЗов по всей Украине — с печатями, подписями, приложением и возможностью архивной записи (по запросу).
Документ максимально приближен к оригиналу и проходит визуальную проверку.
Мы гарантируем, что в случае проверки документа, подозрений не возникнет.
– Конфиденциально
– Доставка 3–7 дней
– Любая специальность
Уже более 2495 клиентов воспользовались услугой — теперь ваша очередь.
Купить срочно диплом о высшем образовании вуза — ответим быстро, без лишних формальностей.
прогноз на футбол prognozy-na-futbol-1.ru .
мелбет офшор http://melbet3005.com/
экспресс прогнозы на спорт экспресс прогнозы на спорт .
mostbet apps download mostbet apps download .
melbet зеркало http://melbet3005.com/
прогноз на спорт сегодня бесплатно http://www.prognozy-na-sport-2.ru .
888starz kirish 888starz kirish .
мелбет. ру https://melbet3004.com/
прогнозы и ставки на спорт http://prognozy-na-sport-3.ru/ .
прогнозы на футбол https://prognozy-na-futbol-1.ru .
ставки на футбол сегодня http://www.prognozy-na-futbol-2.ru .
melbet uk http://melbet3007.com
аттестат 9 11 купить аттестат 9 11 купить .
бесплатные прогнозы на хоккей http://www.prognozy-na-khokkej-segodnya.ru .
melbet скачать апк melbet3005.com
самые точные прогнозы на спорт от профессионалов http://www.prognozy-na-sport-3.ru .
прогнозы ставки на спорт прогнозы ставки на спорт .
экспресс на футбол сегодня https://www.prognozy-na-futbol-2.ru .
mostbet hesab yaratmaq http://mostbet4055.ru/
лучшие прогнозы на хоккей лучшие прогнозы на хоккей .
mostbet uz tennis tikish https://www.mostbet4072.ru
все про спорт прогнозы http://prognozy-na-sport-1.ru/ .
мелбет фрибет за регистрацию melbet3005.com
мелбет мини игры melbet3007.com
онлайн оценка наручных часов http://www.ocenka-chasov-onlajn8.ru .
прогноз ру https://www.stavki-na-sport-prognozy1.ru .
мелбет казахстан http://melbet3007.com
ставки на хоккей http://www.prognozy-na-khokkej-segodnya.ru .
mostbet depozit bonusu https://mostbet4055.ru
мосбкт мосбкт
mostbet az promo kod http://mostbet4055.ru
mostbet aviator demo https://www.mostbet4055.ru
точный прогнозы на футбол http://www.prognozy-na-futbol-2.ru/ .
support melbet support melbet
melbet зеркало рабочее на сегодня http://www.melbet3005.com
условия бонуса в мелбет http://melbet3003.com/
скачать бк 888starz скачать бк 888starz .
melbet скачать 2023 http://melbet3004.com
1win app download 1win3044.com
ставки на хоккей ставки на хоккей .
ставки на хоккей на сегодня prognozy-na-khokkej-segodnya.ru .
стопроцентные прогнозы на спорт https://prognozy-na-sport-1.ru .
точные прогнозы на футбол сегодня бесплатно точные прогнозы на футбол сегодня бесплатно .
melbet roulette melbet roulette
1win casino en línea http://1win3044.com
прогнозы на ставки прогнозы на ставки .
ставки букмекеров на хоккей http://www.prognozy-na-khokkej-segodnya.ru/ .
melbet официальный сайт скачать бесплатно http://melbet3007.com/
прогноз хоккей прогноз хоккей .
прогноз ставок на футбол https://prognozy-na-futbol-2.ru .
мелбет бк отзывы https://melbet3005.com
официальный сайт melbet http://www.melbet3007.com
оценка часов онлайн по фото http://www.ocenka-chasov-onlajn8.ru/ .
mostbet shaxsiy http://www.mostbet4072.ru
прогноз на футбол сегодня https://www.prognozy-na-futbol-1.ru .
Рейтинг товара по оценке пользователей.
Высота подъёма: 280-900 мм.
Низкопрофильный подъемный стол OX NY-100 Low опускается почти до уровня пола, не требуя установки в приямок.
Высота подъема до 3 м. Грузоподъемность до 50000 кг. Размеры индивидуально Скорость подъема от 0,13 м/с.
https://energo-pole.ru/skladskaya-tekhnika/shtabelery/elektroshtabelery/elektricheskie-shtabelery-s-ploshchadkoy/ps16n5500/
грузовые манипуляторы.
Столы с одинарными ножницами.
прогнозы на сегодня спорт https://prognozy-na-sport-2.ru/ .
888starz uz skachat 888starz uz skachat .
бесплатные точные прогнозы https://prognozy-na-sport-1.ru/ .
лайв прогнозы на спорт лайв прогнозы на спорт .
melbet скачать апк melbet скачать апк
футбол прогноз на сегодня prognozy-na-futbol-2.ru .
melbet apk télécharger gratuit https://www.melbet3003.com
точные прогнозы на футбол сегодня бесплатно prognozy-na-futbol-1.ru .
прогноз на хоккей прогноз на хоккей .
косметический ремонт квартиры под ключ косметический ремонт квартиры под ключ .
прогноз на хоккей https://www.prognozy-na-khokkej-segodnya.ru .
mostbet link mostbet link
прогнозы от профессионалов http://www.prognozy-na-sport-1.ru/ .
kupit-suhie-drova-812.ru .
оценить часы в москве http://ocenka-chasov-onlajn9.ru/ .
хоккей прогноз на сегодня prognozy-na-khokkej-segodnya1.ru .
прогноз на хоккей на сегодня http://prognozy-na-khokkej-segodnya.ru/ .
точные прогнозы на футбол сегодня бесплатно http://www.prognozy-na-futbol-1.ru/ .
почему не работает мелбет http://melbet3007.com/
прогнозы ставки на спорт прогнозы ставки на спорт .
прогнозы на спорт онлайн http://www.prognozy-na-sport-2.ru .
Мы предлагаем документы ВУЗов, которые расположены в любом регионе России. Приобрести диплом любого ВУЗа:
купить аттестат за 11 класс в хабаровске
starz 888 starz 888 .
прогнозы на спорт от профессионалов точные бесплатно на сегодня https://prognozy-na-sport-3.ru .
Заказать диплом вы имеете возможность через сайт компании. jobs.colwagen.co/employer/education-ua
promokod melbet promokod melbet
онлайн ломбард часов http://www.ocenka-chasov-onlajn8.ru/ .
прогноз на сегодня футбол http://www.prognozy-na-futbol-1.ru .
mostbet latest version mostbet latest version .
mostbet qeydiyyat pulsuz mostbet qeydiyyat pulsuz
melbet tj скачать https://melbet3003.com
купить диплом в ульяновске купить диплом в ульяновске .
ставки футбол http://www.prognozy-na-futbol-2.ru .
прогнозист ру https://stavki-na-sport-prognozy1.ru .
хоккей прогнозы на сегодня prognozy-na-khokkej-segodnya.ru .
прогнозы на хоккей на сегодня прогнозы на хоккей на сегодня .
Here’s more on the topic https://kinocirk.ru/
оценка стоимости часов онлайн http://www.ocenka-chasov-onlajn9.ru .
мелбет официальный сайт войти http://melbet3007.com/
Покупка дипломов ВУЗов по всей Украине — с печатями, подписями, приложением и возможностью архивной записи (по запросу).
Документ максимально приближен к оригиналу и проходит визуальную проверку.
Мы даем гарантию, что в случае проверки документа, подозрений не возникнет.
– Конфиденциально
– Доставка 3–7 дней
– Любая специальность
Уже более 2242 клиентов воспользовались услугой — теперь ваша очередь.
Купить диплом с занесением — ответим быстро, без лишних формальностей.
mostbet mobil versiya mostbet4055.ru
прогнозы на футбол prognozy-na-futbol-1.ru .
оценка наручных часов http://ocenka-chasov-onlajn8.ru/ .
бесплатные точные прогнозы на спорт prognozy-na-sport-1.ru .
прогнозы на спорт лайв http://www.prognozy-na-sport-2.ru/ .
мостбет приложение ios http://mostbet4072.ru/
mostbet bitcoin bilan to‘lov mostbet bitcoin bilan to‘lov
mostbet ios yukle mostbet4055.ru
прогноз хоккей на сегодня от профессионалов бесплатно http://www.prognozy-na-khokkej-segodnya.ru .
купить диплом с проводкой меня купить диплом с проводкой меня .
ставки на хоккей на сегодня http://www.prognozy-na-khokkej-segodnya1.ru .
Оформиление дипломов ВУЗов по всей Украине — с печатями, подписями, приложением и возможностью архивной записи (по запросу).
Документ максимально приближен к оригиналу и проходит визуальную проверку.
Мы гарантируем, что в случае проверки документа, подозрений не возникнет.
– Конфиденциально
– Доставка 3–7 дней
– Любая специальность
Уже более 1170 клиентов воспользовались услугой — теперь ваша очередь.
Уточнить здесь — ответим быстро, без лишних формальностей.
descargar 1win 1win3044.com
мостбет узбекистан https://mostbet4072.ru
ставки на спорт прогнозы на сегодня ставки на спорт прогнозы на сегодня .
мостбет зеркало узбекистан https://mostbet4072.ru/
This is an amazing guide! I’ve always wanted to try my hand at curing meat, and your step-by-step instructions make it seem achievable. The cost breakdown is really helpful too. Can’t wait to start building my own curing chamber! Thanks for sharing your knowledge!
This post is incredibly helpful! I’ve always wanted to try my hand at curing meats but thought it would be too expensive. Your detailed breakdown and tips make it seem so achievable. Can’t wait to get started on my own curing chamber! Thank you for sharing!
This is a fantastic guide! I’ve been wanting to try my hand at curing meats at home, and your budget-friendly approach makes it seem so doable. The step-by-step instructions are really clear, and I love the creativity in using everyday materials. Can’t wait to get started on building my own chamber!
**sugarmute**
sugarmute is a science-guided nutritional supplement created to help maintain balanced blood sugar while supporting steady energy and mental clarity.
**prodentim**
prodentim an advanced probiotic formulation designed to support exceptional oral hygiene while fortifying teeth and gums.
**nitric boost**
nitric boost is a dietary formula crafted to enhance vitality and promote overall well-being.
**glucore**
glucore is a nutritional supplement that is given to patients daily to assist in maintaining healthy blood sugar and metabolic rates.
**breathe**
breathe is a plant-powered tincture crafted to promote lung performance and enhance your breathing quality.
**potentstream**
potentstream is engineered to promote prostate well-being by counteracting the residue that can build up from hard-water minerals within the urinary tract.
**hepato burn**
hepato burn is a premium nutritional formula designed to enhance liver function, boost metabolism, and support natural fat breakdown.
**prodentim**
prodentim is a forward-thinking oral wellness blend crafted to nurture and maintain a balanced mouth microbiome.
**cellufend**
cellufend is a natural supplement developed to support balanced blood sugar levels through a blend of botanical extracts and essential nutrients.
**revitag**
revitag is a daily skin-support formula created to promote a healthy complexion and visibly diminish the appearance of skin tags.
**neuro genica**
neuro genica is a dietary supplement formulated to support nerve health and ease discomfort associated with neuropathy.
**memory lift**
memory lift is an innovative dietary formula designed to naturally nurture brain wellness and sharpen cognitive performance.
нарколог на дом в ростове нарколог на дом в ростове .
Great post! I love the detailed steps and the budget-friendly approach. I’ve always wanted to try curing my own meats, and this gives me the perfect starting point. Can’t wait to get started on building my own chamber!